AI Style Transfer for Custom Roblox Shirts
Want to design Roblox shirts without being a graphic design expert? AI style transfer makes it possible. By combining a plain Roblox shirt template with AI-generated patterns, you can create unique designs like "cyberpunk neon" or "pastel kawaii" in minutes. Here’s how it works:
- Start with a Roblox shirt template: This flat PNG file outlines the 3D shirt layout.
- Use AI tools to generate patterns: Describe your desired style (e.g., "grunge streetwear"), and the AI creates textures that fit the shirt.
- Refine the design: Align seams, adjust textures, and ensure readability for in-game avatars.
- Export and upload: Save your design as a transparent PNG and upload it to Roblox.
Platforms like Alive Games for Skins simplify the process by offering pre-sized templates, AI enhancements, and direct export options. Whether you’re a beginner or a seasoned creator, this method saves time while helping you produce polished designs that meet Roblox’s guidelines.
Key tips:
- Ensure patterns flow smoothly across seams.
- Avoid inappropriate or copyrighted imagery to comply with Roblox moderation.
- Test your design in-game for alignment and clarity.
AI tools and platforms make creating Roblox shirts faster, easier, and more accessible for everyone.
Roblox Shirt Templates and AI Style Transfer Basics

Roblox Shirt Template Overview
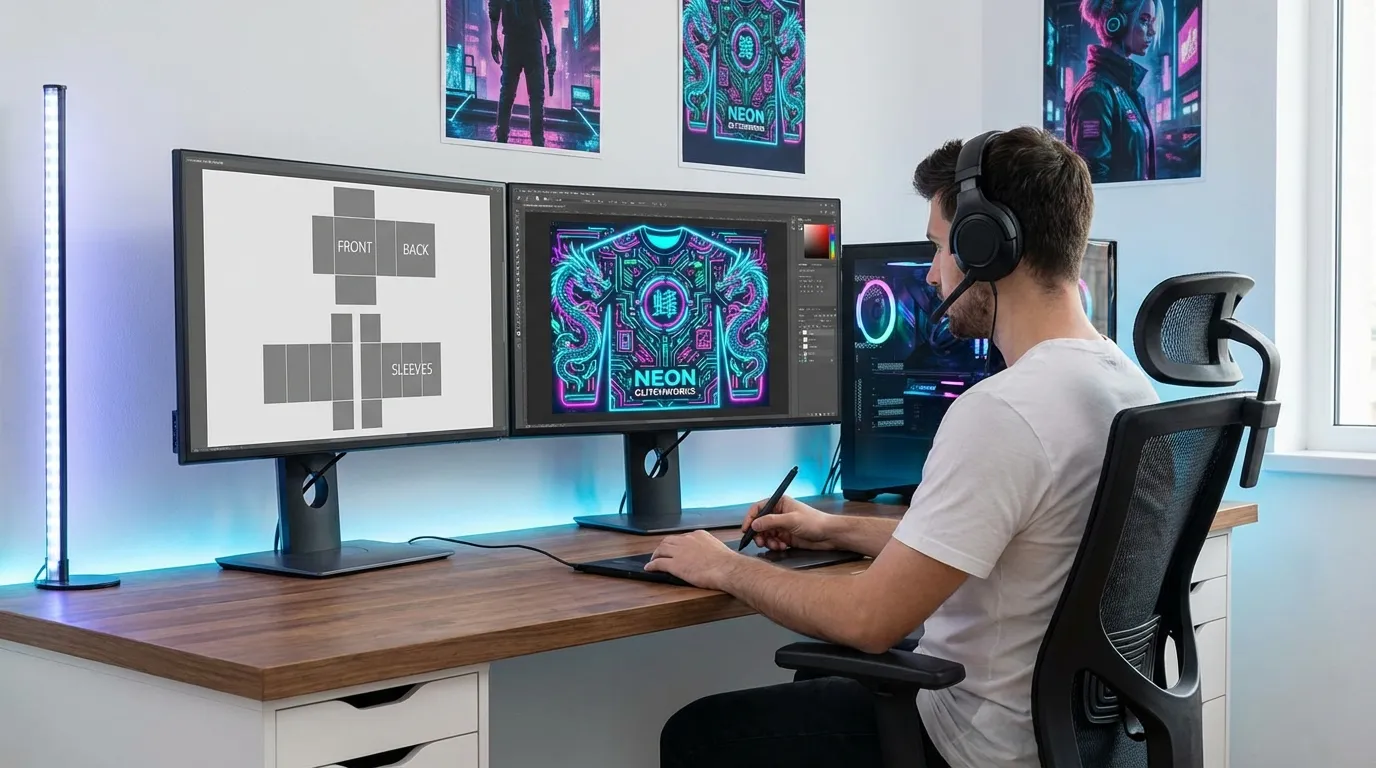
A Roblox shirt template is essentially a blank canvas designed for creating custom shirts for Roblox avatars. This template is a PNG file with specific dimensions, allowing creators to add colors, logos, and patterns to personalize their designs. The template breaks down the 3D shirt into a flat 2D layout, covering all parts such as the front, back, sides, and sleeves.
To ensure a clean and seamless fit on the avatar, it's crucial to use a PNG with a transparent background. The template clearly marks sections for the torso (front and back), sleeves, and side or underarm panels. Many designers use guide layers - like light grid lines or colored zones - to help position key elements such as text or logos, avoiding placement on seams where they might get distorted.
What is AI Style Transfer?
AI style transfer is a fascinating method that lets you apply a specific artistic style to an image while keeping its original structure intact. For Roblox shirt designs, this means you can upload your base template to an AI tool, along with a description of the style you want - like "watercolor sunset", "cyberpunk neon grid", or "comic book ink." The AI then generates a textured version of your design that reflects the chosen style. This approach streamlines the design process, allowing creators to experiment with different styles quickly and produce professional-looking results.
Since the AI works on a flat image, some adjustments may be necessary to ensure the design fits perfectly on the 3D avatar once uploaded.
Key Considerations for Roblox Shirts
When designing Roblox shirts, it's important to ensure patterns flow smoothly across seams and avoid distortions, especially in curved areas like the underarms or torso sides. Minor manual adjustments might be needed to perfect the alignment.
Content moderation is another critical factor. Roblox strictly prohibits clothing designs that include adult content, hate symbols, excessive violence, personal information, or any unsafe imagery. Creators should carefully review AI-generated designs to ensure they don’t unintentionally include inappropriate elements or shapes that could be misinterpreted. Designs must be suitable for a younger audience.
Tools like Alive Games for Skins simplify the process by offering pre-sized layouts and layer controls for easy adjustments. This tool allows creators to apply AI-generated patterns to specific shirt sections, preview how the design will look in-game, and export PNG files in the correct format - all without needing advanced graphic design software.
Testing your design in-game is a crucial step. What looks perfect on your screen might reveal alignment issues, color mismatches, or readability problems when applied to a moving avatar under Roblox’s lighting. Always upload a test version, try it on your avatar, and view it from various angles to ensure everything looks just right before finalizing your design.
Next, we’ll dive into selecting the best AI tools to help you bring your creative vision to life.
Selecting AI Style Transfer Tools
Finding the right AI tool for designing Roblox shirts can make your workflow smoother and more efficient. From general-purpose AI image generators to platforms tailored specifically for game assets, knowing what features to prioritize will help you choose the best option for your needs.
What to Look for in AI Tools
When evaluating AI tools, keep these key features in mind:
- File format support: Roblox requires PNG files with transparent backgrounds for shirt uploads. Test the tool to ensure it preserves transparency when working with PNG files.
- Resolution control: Roblox textures need to be up to 1024×1024 pixels. Make sure the tool can export at this resolution or higher to avoid blurry designs.
- Aspect ratio and canvas layout: Roblox's shirt templates have specific shapes, so it's important to use tools that let you control aspect ratio and composition. This ensures that key design elements don’t end up awkwardly placed, like across seams or outside visible areas.
- Layer support and masking: Tools with these features allow for precise design adjustments. For example, you can protect seam areas or keep logos and text intact while applying AI effects.
- Content safety features: Roblox has strict content guidelines, so tools with built-in filters can help flag outputs that might violate policies.
- Preview and iteration speed: Fast previews and predictable pricing in U.S. dollars can save time and help you experiment more efficiently.
These features will guide you in selecting tools that work well for Roblox-specific designs and general AI applications.
Types of AI Tools for Style Transfer
Once you've identified the features you need, it’s time to explore the different types of AI tools available.
Neural style transfer apps: These tools combine your shirt template with a reference style image, creating designs inspired by styles like impressionist art or manga. While they’re great for artistic textures, they often lack game-specific features, meaning you’ll need to manually ensure the output fits Roblox’s requirements. Desktop versions provide more control but usually require installation and cost between $20 and $50 for a one-time purchase.
Web-based AI editors: These browser-based tools have become popular for their convenience - no downloads or installations required. They often include extra features like background removal, upscaling, and color adjustments. Subscription models are common, with prices ranging from $10 to $30 per month, and many offer free tiers with limited functionality. While earlier versions lacked precision, modern web editors are closing the gap with desktop software.
Roblox-aware AI platforms: These tools are specifically designed for Roblox shirt templates. They align textures with Roblox’s layout, reducing the need for manual adjustments. Some even include presets, templates, and direct publishing workflows to Roblox, streamlining the process. However, their focus on Roblox may limit their usefulness for other creative projects.
Game-skin-specific platforms: Platforms like Alive Games for Skins cater to multiple games, including Roblox, Fortnite, and Minecraft. These browser-based editors offer templates, customization tools, and export options that fit Roblox workflows. For example, you can generate AI-styled textures, align them with Roblox templates, and export ready-to-upload files. This approach is especially helpful for creators managing designs across multiple games, though the interface may feel less specialized compared to Roblox-only tools.
Testing and Scaling Your Workflow
Before committing to a tool, test its capabilities with a simple design. Run the design through the entire process - from import and style transfer to final export. Check if it maintains transparency, aligns seams correctly, and preserves small details like text. Many platforms offer free trials or limited free tiers, making it easy to compare a few options.
For advanced creators scaling up production, look for tools with batch processing, API access for automation, or the ability to upload custom style references. These professional-grade features can significantly speed up workflows, especially when producing collections or seasonal designs.
Creating a Custom Roblox Shirt Using AI Style Transfer
Designing a custom Roblox shirt with AI style transfer involves a mix of creativity and technical precision. You'll need to set up the template correctly, generate AI textures that fit Roblox's layout, and ensure everything aligns perfectly for an in-game-ready look.
Preparing the Roblox Shirt Template
First, download the official Roblox classic shirt template from the Roblox Create page. Save it as a PNG file in a dedicated project folder on your computer.
Open your image editor and create a new document using the template's dimensions. Place the template on a locked layer and add separate layers for the base color, AI textures, shading, and details. This setup ensures you can tweak each element individually without disturbing the template itself.
Set your canvas resolution to 1024×1024 pixels. Roblox supports textures up to this size, and starting at full resolution helps maintain quality. Make sure your editor preserves PNG transparency throughout the process, as Roblox requires transparent backgrounds for proper rendering.
Applying AI Style Transfer to Textures
With the template ready, shift your focus to generating textures using AI. Decide on a style - whether it's watercolor, geometric patterns, grunge textures, or something inspired by a specific art movement. When using your AI tool, focus on creating tileable or seamless textures rather than complete designs. For instance, instead of requesting "a cool shirt design", try prompts like "seamless denim fabric texture, high detail" or "repeating geometric pattern, navy blue and gold." Stick to square outputs like 512×512 or 1024×1024 pixels.
Generate multiple texture variations and save them. Different parts of the shirt might require distinct textures or color adjustments. For example, you could use a bold pattern for the torso while opting for subtler textures on the sleeves to keep the design balanced.
Import your AI-generated textures into your editor as new layers beneath the locked template. Resize and position each texture to fit the corresponding section of the shirt. The main torso area (the large rectangle in the template's center) can often use a single texture, while sleeves and side panels might need cropped or adjusted textures.
Use layer masks or the eraser tool to trim textures so they don’t spill into adjacent template sections. Pay close attention to the gray guide lines on the template, as they indicate where fabric edges meet on the avatar.
To control the intensity of your textures, adjust the opacity and blending modes of the layers. A texture at full opacity might look overpowering, but reducing it to 70-80% and layering it over a solid base color often creates a more polished result. Experiment with blending modes like Multiply or Overlay to see how the texture interacts with the base color.
Aligning Seams and Finalizing the Design
Once your textures are in place, make sure the design flows seamlessly across all sections of the shirt. To check seam alignment, duplicate and offset your texture to simulate how edges will connect. Manually adjust any areas where the design doesn’t line up.
Avoid placing key design elements on the sleeves, as they can appear distorted on the flat template. While the sleeves may look odd in 2D, they render more naturally on the 3D avatar.
When you’re satisfied with the textures and seam alignment, flatten the layers you’re happy with (but always keep a backup of the layered file). Zoom out to simulate the in-game view - details that look crisp up close might lose clarity when scaled down on the avatar.
If you’re adding text or logos, create them on separate layers above the textures. Reduce the texture’s contrast or add a semi-transparent color overlay in areas where text will sit to ensure readability. Use clean, bold fonts and avoid placing text across multiple template sections. Keeping text centered on the main torso rectangle usually delivers the best results.
Finally, hide the guide layer, verify that the background is transparent, and export the design as a flattened 1024×1024 PNG. Save your project in the editor’s native format (like PSD or XCF) so you can revisit and tweak the design later if needed.
Refining Designs for Readability and Moderation Compliance
AI-generated textures can look stunning in high resolution but often lose their appeal when applied to a moving Roblox avatar. Before uploading your custom shirt, double-check that key design elements remain recognizable during gameplay and ensure your work adheres to Roblox's moderation guidelines.
Improving Visual Clarity
For a design to be readable, logos, icons, and text must stay clear when viewed from typical in-game distances. AI-generated textures, while detailed, often blur in Roblox environments. Focus on clear silhouettes, simple shapes, and minimal text to keep your design crisp.
A quick way to test readability is to zoom out to avatar-size previews in your editor. Shrink your template to about 10–15% of its original size. If the main shapes and text become indistinguishable at this scale, they’ll likely be unreadable in-game. Adjust these elements for better clarity before finalizing your design.
Lighting and background conditions in Roblox can also impact visibility. Avoid low-contrast color combinations - dark gray text on a dark blue shirt, for example, will vanish in shadowy areas. Test your design against both light and dark backgrounds by placing colored rectangles behind it. Boost contrast and brightness, as subtle details often get muted under Roblox lighting.
For overly complex AI textures, try simplifying them without losing the overall vibe. Techniques like adding a soft blur to noisy areas, reducing the color palette, or masking busy sections can help. For instance, if you’ve generated a "galaxy" texture that feels cluttered, darken the edges, brighten a nebula in the center, and outline any logo to make it pop. This way, you maintain the cosmic theme while ensuring the design is readable.
Text clarity is equally important. Stick to short phrases, bold sans-serif fonts, and high-contrast pairings between text and background. Avoid placing text over busy patterns, which can distort the lettering. If needed, add a semi-transparent overlay behind the text to separate it from textured areas. Keep text centered on the torso section of the template to prevent awkward wrapping on the 3D avatar.
Enhancing clarity not only improves how your design looks during gameplay but also helps it comply with Roblox's content standards.
Following Roblox Content Rules
Once your design is visually clear, make sure it aligns with Roblox's strict content guidelines.
Roblox prohibits content featuring nudity, sexual themes, graphic violence, hate symbols, or references to real-world politics and adult topics. AI tools can unintentionally generate shapes that resemble banned symbols, logos, or inappropriate imagery. Always review and edit AI-generated outputs carefully before uploading.
Copyright and trademark issues are another concern. Avoid using recognizable brand logos, copyrighted characters, or designs that mimic existing artwork - even if created through AI prompts. For example, prompts like "Nike swoosh pattern" or "Mario-style mushrooms" can result in designs that breach intellectual property rules. Inspect your textures for any lookalike elements and replace them with original, generic symbols to avoid takedowns or moderation penalties.
Because Roblox caters to a global, younger audience, steer clear of anything potentially offensive. This includes inappropriate slogans, stereotypical imagery, or references to sensitive real-world events. A good rule of thumb: if you wouldn’t put the design on a kids' T-shirt sold in a U.S. retail store, it’s probably not suitable for Roblox.
Before uploading, run through this checklist:
- Flip the design horizontally and view it in grayscale to spot hidden shapes or text that might be offensive.
- Inspect the chest and back areas for patterns resembling weapons, adult content, or banned symbols.
- Get a second opinion from a friend or teammate on any borderline designs.
To guide AI tools toward safer designs, focus on simple, abstract ideas rather than specific objects or themes. Family-friendly prompts like "bright minimalist wave pattern" are far safer than riskier ones like "realistic battlefield scene." Stick to concepts involving geometric patterns, stylized nature scenes, or original mascots with clear, vibrant colors to keep your designs compliant and engaging.
Exporting and Uploading Your Custom Shirt to Roblox
Once your AI-enhanced shirt design is complete, the next steps involve exporting it in the correct format and uploading it to Roblox. Getting these technical details right ensures your design looks great in-game and meets Roblox's requirements.
Exporting the Final Design
Roblox requires shirt textures to be PNG files with dimensions of 585 pixels wide by 559 pixels tall. This specific size ensures the design wraps smoothly around the avatar's torso, sleeves, and collar without any distortion.
Before exporting, make sure to:
- Flatten or merge all visible layers while keeping transparency intact in areas meant to remain see-through.
- Remove or hide any background layers to prevent them from covering the avatar's skin tone.
- Set your color profile to sRGB to match how Roblox renders textures, avoiding any unexpected color changes.
For easy file organization, use descriptive names like "streetwear_hoodie_blue_v2_front-logo.png" and store them in clearly labeled folders, such as "Roblox_Shirts/Final_Exports". Avoid renaming files after linking them to in-game assets to prevent confusion.
If you've used AI tools to enhance textures, double-check the exported file for any compression artifacts or noise. AI-generated images might need resizing to the required 585×559 dimensions. Use high-quality resizing methods, like bicubic resampling, to maintain sharpness, and avoid repeated compression, which can degrade the image quality.
Once your design is exported and ready, you can move on to uploading it to Roblox.
Uploading to Roblox
To upload your shirt design, follow these steps:
- Log in to the Roblox website and go to the Create section.
- Under the Avatar Items tab, select Shirts to access the upload interface.
- Click Choose File and select your PNG file. Roblox will display a flat preview of your design.
- Give your shirt a clear, descriptive name, like "Neon Cyberpunk Hoodie" or "Retro Wave Tee", to reflect its style.
Keep in mind that Roblox may charge a small fee in Robux for uploading shirts. Robux can be purchased in fixed USD bundles, such as $4.99 or $9.99. Additionally, some monetization features may only be available to users with a Roblox Premium subscription.
After completing the upload and any required payments, Roblox will generate a 3D preview of your shirt. Open the item's details page and use the 3D viewer to inspect how the design wraps around the avatar's torso, sleeves, and seams. Test your shirt on both R6 and R15 avatar types, as their differing proportions can reveal potential alignment or stretching issues.
If everything looks good in the 3D preview, your shirt is ready to wear or sell. If you notice any problems, adjust your original file and re-upload the revised version.
Fixing Common Issues
Here are some common problems you might encounter during the upload process and how to address them:
- Misaligned seams: If parts of the design don't line up where the front and back meet, double-check your template to ensure all elements are correctly positioned within their zones.
- Stretching or distortion: Verify that your PNG file is exactly 585×559 pixels to avoid uneven stretching.
- Blurriness: If your design looks fuzzy in the 3D preview or in-game, re-export the texture using a lossless PNG setting instead of a compressed option.
- Moderation rejections: If your shirt is flagged, review the design for any unintended elements that might violate Roblox's guidelines, especially in the chest and back areas. Edit and re-upload the corrected file.
To make troubleshooting easier, keep your project files organized. Save original layered files and multiple export versions in a dedicated folder. This way, you’ll have everything you need to refine your designs quickly and efficiently.
Using Alive Games for Skins
Alive Games for Skins simplifies the process of turning AI-generated textures into Roblox-ready shirt designs. Forget juggling multiple tools or manually managing template files - this browser-based platform lets you work online without downloading any software. It's especially convenient for creators who switch between devices and need a consistent, accessible workflow.
"Alive Studio is our free online tool that allows you to create and customize your own Roblox shirt templates without the need to download any software." - Alive Games
The platform comes with preloaded Roblox shirt templates, ensuring your designs have the correct dimensions right from the start. This eliminates the hassle of searching for blank templates or double-checking measurements, allowing you to focus on creativity.
Working with AI-Enhanced Designs
Once you've created a custom AI-generated texture, integrating it into Alive Games is a breeze. Open the platform in your browser, select Roblox as your target game, and pick a preloaded shirt or torso template. Then, upload or import your AI-generated PNG file.
The texture is applied directly to the shirt template, and the platform's layer-based editor lets you adjust it with ease. Drag, scale, or rotate the texture to align it perfectly with the front, back, and sleeves. You can also fine-tune seams using layer masks and blending tools.
Alive Games takes things further with a prompt-based editor that allows you to create 3D assets from text descriptions. For example, if your AI-generated texture needs a logo or text overlay, you can add these elements directly in the same interface - no need to switch to another program.
"Whether you're a studio or a player, Alive is so easy to use that even a player with no skills can create 3D assets just from a prompt and a simple editor." - Alive Games
This all-in-one approach is perfect for iterating on multiple designs. Instead of constantly exporting, checking, and re-importing files across different tools, you can preview and refine everything in one place. The built-in 3D preview shows how your design wraps around a Roblox avatar in real time, helping you catch alignment or stretching issues before finalizing your work.
Exporting Finalized Files
Once you're satisfied with your design, exporting is quick and straightforward. Alive Games generates Roblox-compatible PNG files with the correct dimensions and transparency settings, so you don't have to worry about manual adjustments.
"However, when using Alive Studio, this is preloaded for you so you do not have to download the roblox shirt template until you have it exactly how you want it." - Alive Games
To stay organized, use clear and descriptive filenames for your exports, like "Roblox_Shirt_NeonGalaxy_v2.png" or "Roblox_Shirt_RetroWave_Final.png". Store them in well-labeled folders on your computer, such as "Roblox_Shirts/AI_Designs/December_2025". This makes it easier to match thumbnails to files when uploading multiple designs to Roblox's Avatar Items section.
Alive Games shines when you're managing multiple AI-enhanced designs. Traditional graphic tools often require setting up templates, checking dimensions, and tweaking export settings for each file. With Alive Games, these steps are automated, saving you time whether you're a casual player making a few shirts or a studio creating an entire collection.
Since the platform is free and runs entirely in your web browser, there’s no need to worry about installation, subscription costs, or export limits. You can start working with your AI-generated textures immediately and create as many designs as you like, all without spending a dime.
Conclusion
AI style transfer has made designing custom shirts for Roblox creators faster and more accessible, even for those without graphic design expertise. The process is simple: start with a template, apply AI style transfer, check for seams, and then export and upload. This efficient workflow not only saves time but also ensures your designs maintain visual appeal and comply with Roblox's guidelines.
When designing, focus on placing important details on the torso panels for better clarity during gameplay. Always review AI-generated designs before uploading to confirm they align with Roblox's community standards. Following these steps helps protect your account and ensures your creations can reach a broad audience.
To make things even smoother, Alive Games for Skins offers tools like pre-made templates, AI workflows, and automatic export settings to simplify the design process.
"Alive Studio is our free online tool that allows you to create and customize your own Roblox shirt templates without the need to download any software." - Alive Games "Whether you're a studio or a player, Alive is so easy to use that even a player with no skills can create 3D assets just from a prompt and a simple editor." - Alive Games "However, when using Alive Studio, this is preloaded for you so you do not have to download the roblox shirt template until you have it exactly how you want it." - Alive Games
Keep track of successful prompts and templates to refine your approach over time. With streamlined workflows and intuitive tools, transforming your creative ideas into Roblox-ready shirts has never been more straightforward.
FAQs
How does AI style transfer make designing custom Roblox shirts easier and more creative?
AI style transfer has transformed how Roblox shirts are designed, taking what was once a time-consuming and skill-intensive process and making it quicker and more accessible. Forget spending hours fine-tuning every detail - AI tools let you add artistic styles, patterns, and textures to your designs with just a few clicks.
These tools make it easy to play around with templates, colors, and effects, allowing anyone to create polished, professional-looking shirts without needing a background in design. Plus, they often include simple exporting options, so your creations are ready to upload and use in Roblox without any hassle.
How can I ensure my AI-generated Roblox shirt designs follow Roblox's content guidelines?
Creating Roblox shirt designs that align with Roblox's content guidelines is essential to ensure they are suitable for all users. Stick to designs that steer clear of offensive, copyrighted, or inappropriate images, text, or symbols. Pay attention to prohibited themes, such as violence, adult content, or hate speech, as Roblox strictly enforces these rules.
When it comes to exporting your designs, make sure they meet Roblox's technical specifications. Use the PNG file format, set the resolution to 585x559 pixels, and ensure the design is properly aligned with the shirt template. Always review your work carefully before uploading to avoid unintentional guideline violations. Following these steps will help you produce high-quality designs that are ready for Roblox.
What should I look for in an AI tool to design custom Roblox shirts?
When picking an AI tool to design Roblox shirts, prioritize features like customizable templates, a simple and intuitive editor, and the option to craft designs directly online without needing extra downloads. Tools that allow for easy exporting in formats compatible with Roblox can make the process much smoother.
For a straightforward and efficient experience, opt for platforms that streamline the design process while still giving you the freedom to create unique, high-quality shirts that match your personal style.