How to Add Utility Belts to Roblox Outfits
Utility belts are a great way to make your Roblox avatar stand out, whether you're going for a tactical, adventurous, or casual look. Here's a quick breakdown of how to design and add one:
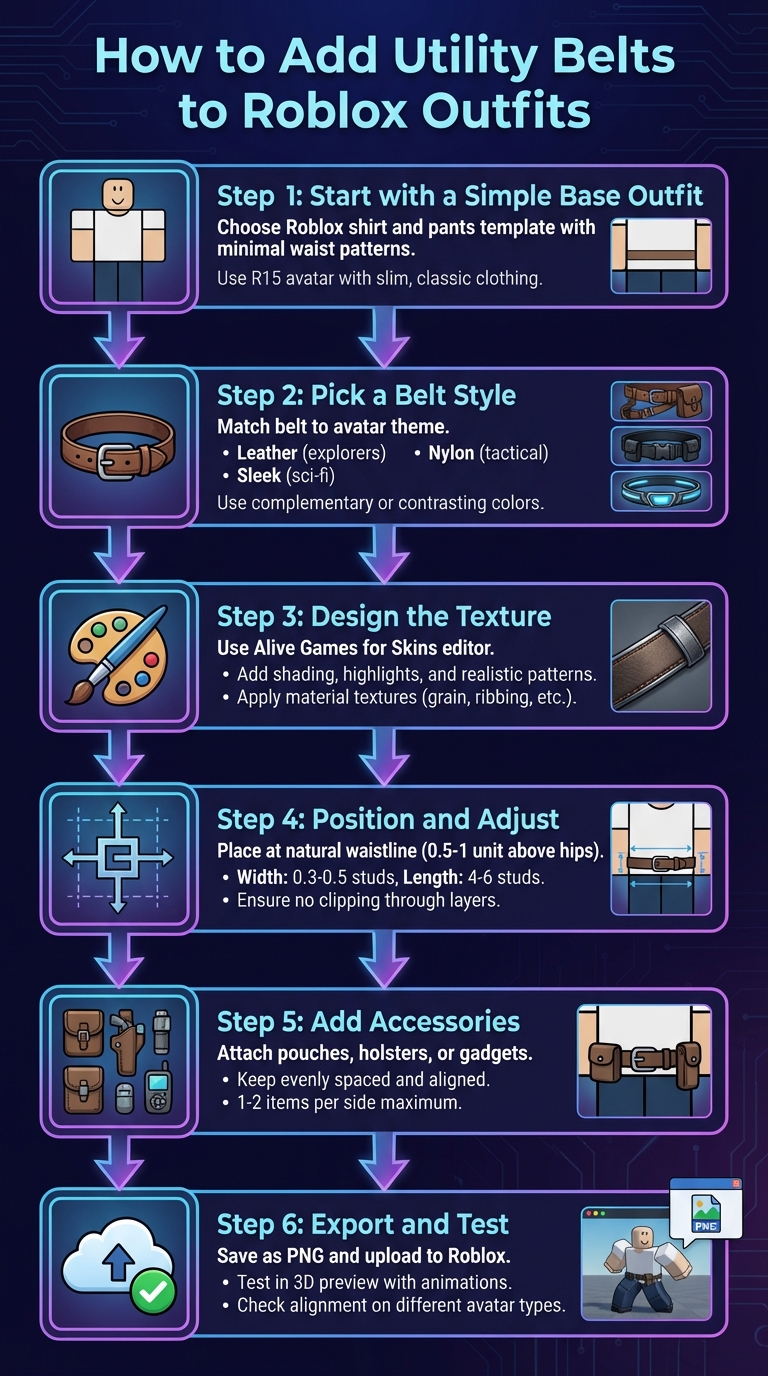
- Start with a Simple Base Outfit: Choose a Roblox shirt and pants template with minimal patterns around the waist for better visibility.
- Pick a Belt Style: Match the belt to your avatar's theme - leather for explorers, nylon for tactical builds, or sleek designs for sci-fi looks. Keep colors complementary or contrasting for balance.
- Design the Texture: Use tools like Alive Games for Skins to create belt textures. Add shading, highlights, and realistic patterns (like grain for leather or ribbing for nylon) for a 3D effect.
- Position and Adjust: Place the belt at the natural waistline, ensuring it fits properly on the avatar and doesn’t clip through other layers.
- Add Accessories: Attach pouches, holsters, or gadgets, keeping them evenly spaced and aligned for a polished look.
- Export and Test: Save your design as a PNG, upload it to Roblox, and test it in 3D to ensure proper alignment and visibility during animations.
Selecting Your Base Outfit and Belt Style
Picking the Right Roblox Outfit Template
The base outfit you choose plays a big role in how visible and effective your utility belt will be. Start with a Roblox shirt and pants template that keeps the waist area simple - steer clear of busy patterns or heavy shading around the torso's midsection. These can make the belt harder to see and add unnecessary visual clutter.
For the best results, use an R15 avatar with slim, classic clothing. The segmented torso and leg joints help keep the belt centered as your avatar moves. On the other hand, bulky or layered clothing can hide belt textures or cause clipping issues. If the belt is a key part of your design, stick to slimmer tops like T-shirts, tank tops, or fitted uniforms instead of oversized hoodies or coats.
If you're using Alive Games for Skins, opt for a customizable Roblox template that clearly shows the torso and leg seams. Use the zoom and grid tools to mark where the belt will sit - usually just above the pants line. Save a duplicate of your base file, so you can easily test different belt styles and make sure they fit well on various avatar builds.
Once your base is set, it’s time to choose a belt style that complements your avatar's overall look.
Choosing Belt Style and Materials
Your belt style should match your avatar’s role or theme. For example:
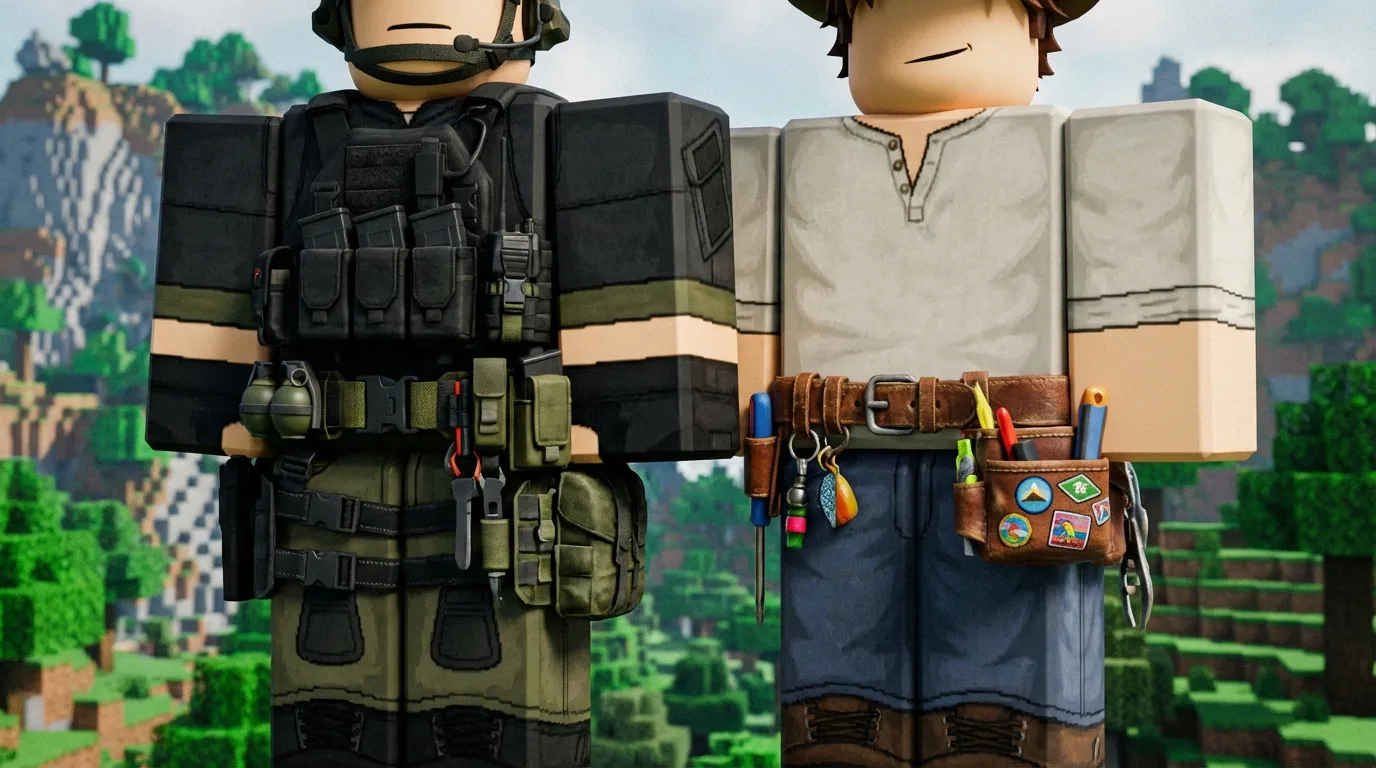
- Tactical designs work well for shooters, police, or military roleplay. Pair dark utility clothing with black or olive nylon belts that include magazine pouches, radios, or other gear.
- Adventurer looks pair rugged tops and cargo pants with brown leather belts featuring canteens, compasses, or similar accessories.
- Casual outfits like jeans and T-shirts go great with thin belts that carry small pouches or clips for a laid-back vibe.
The material of the belt also matters for the overall appearance. Leather belts offer a textured, grainy look and softer highlights, making them perfect for rustic or earthy designs in brown or tan tones. Nylon or synthetic belts, on the other hand, have a smoother surface with sharper reflections, which works better for modern tactical or sci-fi outfits. Try not to mix too many material types - if your outfit is mostly fabric and leather, stick to a matching leather belt rather than adding a shiny plastic element that might feel out of place.
When it comes to color, your belt should either match a secondary color in your outfit (like boots, gloves, or vest trim) or contrast enough to stand out. For instance, a dark gray tactical uniform pairs well with a black or olive belt, while a light explorer outfit looks great with a brown belt that ties into the color of the boots. This approach helps create a balanced and cohesive design.
Creating the Utility Belt Texture and Pattern
Using the Web-Based Editor for Texture Design
Alive Games for Skins offers Roblox-ready templates that simplify the process of designing your belt. These templates are mapped directly onto the torso's UV layout, so you won’t waste time figuring out where each element belongs. The best part? The web editor works entirely online - no downloads needed. Just open a Roblox shirt template (either 585×559 px or 1024×1024 px) and zoom in on the waist area to focus on designing the belt.
Start by creating a base layer: draw a horizontal strip across the torso's midsection and center the buckle in the middle. Choose a base color that fits your belt's style - dark brown for leather, black or olive for tactical nylon, or gray for a futuristic metal look. Next, add a material texture layer and set the opacity low (20–50%), using blending modes like Overlay or Multiply. For leather belts, apply a subtle grain texture to mimic the natural pores of leather. For fabric belts, use a fine diagonal or grid weave pattern. If it’s a tactical nylon belt, add horizontal ribbing or webbing strips. For sci-fi metal, include details like panel lines, bolts, and glowing strips, along with sharp highlights instead of a grainy texture.
To keep your design organized, group related elements like "Front buckle" or "Left pouches." Lock the base layers once everything is aligned, making it easier to test different accessory placements or color schemes without disrupting the core design.
With the base and texture layers ready, the next step is to add depth with shading and highlights.
Adding Shading and Highlights
To give the belt a realistic, three-dimensional look, start with a Shadows layer set to Multiply mode. Use a soft round brush with low opacity (15–30%) and a slightly darker shade of your belt's base color. Paint shadows along the upper and lower edges of the belt strip to create the illusion of curvature. Focus on darkening areas where pouches overlap the belt or where the belt tucks under imagined folds of clothing on the sides. Add deeper shadows beneath buckles and larger accessories to show where they press against the belt and the avatar’s torso. To enhance depth, make the belt's side sections darker than the front.
Next, create a Highlights layer set to Screen or Add mode. Use a soft, near-white brush lightly tinted with the belt's main color. Add a thin highlight along the top edge of the belt strip, concentrating on the front center where light would naturally hit and tapering the brightness toward the sides. For metallic buckles or clips, use sharper, smaller highlights - short bright lines or dots on corners and top edges can simulate reflective surfaces. Be careful not to overdo it; overly bright highlights can look unnatural in Roblox's varied lighting environments. If needed, use the blur or smudge tools to soften transitions, ensuring the shading blends smoothly and avoids a streaky appearance.
Placing and Adjusting the Utility Belt on Your Avatar
Positioning the Belt Around the Waist
Start by placing the belt at the avatar's natural waistline. In the Alive Games editor, center it horizontally so there’s equal spacing on both sides. Adjust the Y-axis position to sit about 0.5–1 unit above the hips. This prevents the belt from clipping into the character's legs or lower torso. If your avatar is wearing layers like a jacket or shirt, position the belt slightly forward so it rests neatly on top without intersecting with the base mesh. Use the alignment tools in the editor to snap the belt perfectly to the character's center line for symmetry.
Once positioned, check the belt’s placement from multiple angles using the editor's view modes. It’s important the distance between the belt and the avatar’s body stays consistent as you rotate the view. This ensures the belt won’t look twisted or misaligned when seen in-game from different perspectives. A good initial setup here makes later adjustments much easier.
Adjusting Size and Rotation
With the belt in place, fine-tune its size and rotation. Use the scale tool to adjust the belt’s dimensions - aim for a width of 0.3–0.5 studs and a length of 4–6 studs for standard avatars. For rotation, tweak the Y-axis in small increments (5–10°) to ensure the belt wraps evenly around the waist. It should sit flat and maintain a consistent angle relative to the torso. If it looks tilted or uneven from any view, keep adjusting until it aligns properly.
For avatars with different body types, scale the belt accordingly. Reduce its size by 15–20% for slimmer characters or increase it by 10–15% for larger builds. Always test the belt using the 3D preview feature on various avatar models. This step ensures the belt looks proportional and fits well across different sizes and poses before you finalize and export it.
Attaching Accessories to the Utility Belt
Placing Accessories on the Belt
Once your belt is properly adjusted and positioned, it’s time to attach the accessories that will enhance both its functionality and appearance.
Start with the essentials like pouches and holsters, as these set the tone for the belt’s overall look. Position holsters near your hips for balance and practicality. Smaller pouches can go toward the front or slightly off-center to avoid making the design feel cluttered.
Keep the number of accessories in check to maintain a clean, organized appearance. A good rule of thumb is to place one or two items on each side and, if needed, one in the center. If you’re using the Alive Games for Skins web-based editor (https://alivegames.io), take advantage of the texture template’s grid lines or alignment guides to ensure everything stays level and symmetrical.
Before finalizing, preview your design in 3D. Check that the accessories are visible from all angles - front, side, and back. Make sure nothing overlaps awkwardly or disappears behind the avatar’s body. If an accessory looks flat or distorted, tweak its angle slightly to follow the natural curve of the avatar’s waist.
Finally, refine the overall arrangement by focusing on layering and spacing for a polished, cohesive look.
Managing Layering and Spacing
After placing your accessories, it’s time to fine-tune their layering and spacing. The belt itself should act as the base layer, with accessories stacked on top in order of size - start with larger items like holsters and pouches, then add smaller details like tool clips or gadgets. This way, every element remains visible and nothing gets overshadowed.
Leave a small gap between each accessory to keep the design clean and ensure each piece is distinguishable. Use the editor’s spacing guides to measure distances precisely. To add depth, consider applying subtle drop shadows to the accessories.
Before wrapping up, review your design at different zoom levels in the 3D preview. This helps confirm that all elements are clear, well-positioned, and visually appealing from every angle.
Exporting Your Completed Outfit
Checking Your Design in 3D
Take a moment to rotate your avatar and inspect the belt from every angle - front, sides, and back. Use the 3D preview tool to zoom in on seams and corners. If the belt line looks smooth and continuous, it means your 2D texture is properly aligned.
Test your design on different avatar body types, such as R15 and R6 rigs, and pair it with other layered clothing items like jackets or vests. This helps ensure the belt won’t clip through other gear or get hidden. If the belt looks too flat in the 3D view, try enhancing the shading and highlights on your texture file. Re-export and preview it again until the depth and details stand out, even at the typical zoom levels used in gameplay.
Also, double-check that the belt's color contrasts well and that any accessories are clearly visible during animations. Catching these issues now can save you from spending Robux on uploads that don’t meet your expectations.
Once you’ve confirmed everything looks good in 3D, you’re ready to export and test it in Roblox.
Exporting and Testing in Roblox
Switch your editor to a Roblox-compatible template to ensure the canvas size and UV mapping are correct. Export your design as a high-resolution PNG file with transparency to keep all the fine details intact. If you're using a tool like Alive Games for Skins, select the Roblox export option, download the texture, and save a backup copy with a versioned name (e.g., UtilityBelt_Tactical_v2.png).
Next, head over to Roblox Create → Shirts/Pants and upload your PNG file. Give it a clear, descriptive name. Keep in mind there’s a small Robux fee for each upload, so only submit designs that are fully finalized. Once the asset passes moderation, equip it on your avatar using the Avatar Editor and inspect it again in 3D. If you notice any misalignment, go back to your source texture, make the necessary fixes, and re-upload.
Finally, test your asset in Roblox Studio by inserting a dummy rig. Check that the belt and any attached accessories stay properly aligned during animations like idle, walking, and jumping. If you’re working with 3D belt accessories, such as pouches, adjust their attachment points in Studio to ensure they fit snugly on the waist.
(UPDATED) How to make a belt | ROBLOX DESIGNING
Conclusion
To add a utility belt to your Roblox avatar, start by choosing a base outfit and belt style, then use shading and highlights to create texture. Position the belt carefully on your avatar, attach accessories, and export the final design to Roblox. Proper positioning is key - it not only enhances the visual appeal but also ensures the belt functions seamlessly, as outlined earlier.
When adding accessories, distribute them evenly along the belt. Avoid clustering items in one area, and maintain proper spacing to keep each accessory distinct. Be mindful of layering to prevent accessories from cutting into the torso or overlapping awkwardly in 3D views. These small adjustments contribute to a polished and professional look.
Tools like Alive Games for Skins simplify this process by offering a web-based editor with preloaded Roblox templates. This platform allows users to create high-quality assets and export them as .png files, ready for upload to Roblox. Final testing in Roblox helps confirm that your design adjustments work as intended.
Utility belts not only add a touch of style but also bring functionality to your avatar. By following this streamlined approach, you can craft designs that are both creative and practical, ensuring your Roblox outfits truly stand out.
FAQs
How can I stop a utility belt from overlapping or clipping through clothing on my Roblox outfit?
When working with a utility belt, place it on a separate clothing layer to prevent any clipping with other outfit elements. Slightly adjust its position - either forward or backward - to ensure there's enough space between the belt and the rest of the outfit. Also, double-check that the belt’s size and placement align well with the avatar’s body proportions. Finally, test the outfit in different poses to catch and resolve any lingering clipping problems.
How can I create realistic utility belt textures for Roblox outfits?
To create lifelike utility belt textures for Roblox outfits, consider using Alive Studio, an online tool designed for crafting detailed and high-quality textures. This platform provides customizable templates and an intuitive editor, making it simple to design intricate belt textures without the hassle of downloading extra software.
With Alive Studio, you can effortlessly apply your textures to Roblox outfits, giving your avatars a refined and professional appearance.
How do I make sure a utility belt fits properly on different Roblox avatars?
To make sure your utility belt fits perfectly on different Roblox avatars, take advantage of Alive Games' easy-to-use tools. These allow you to tweak the belt’s size, position, and proportions effortlessly. Try out your design on a variety of avatar models within the platform to refine the fit and ensure it looks great on all body types.