How to create FiveM Clothing with Alive Studio
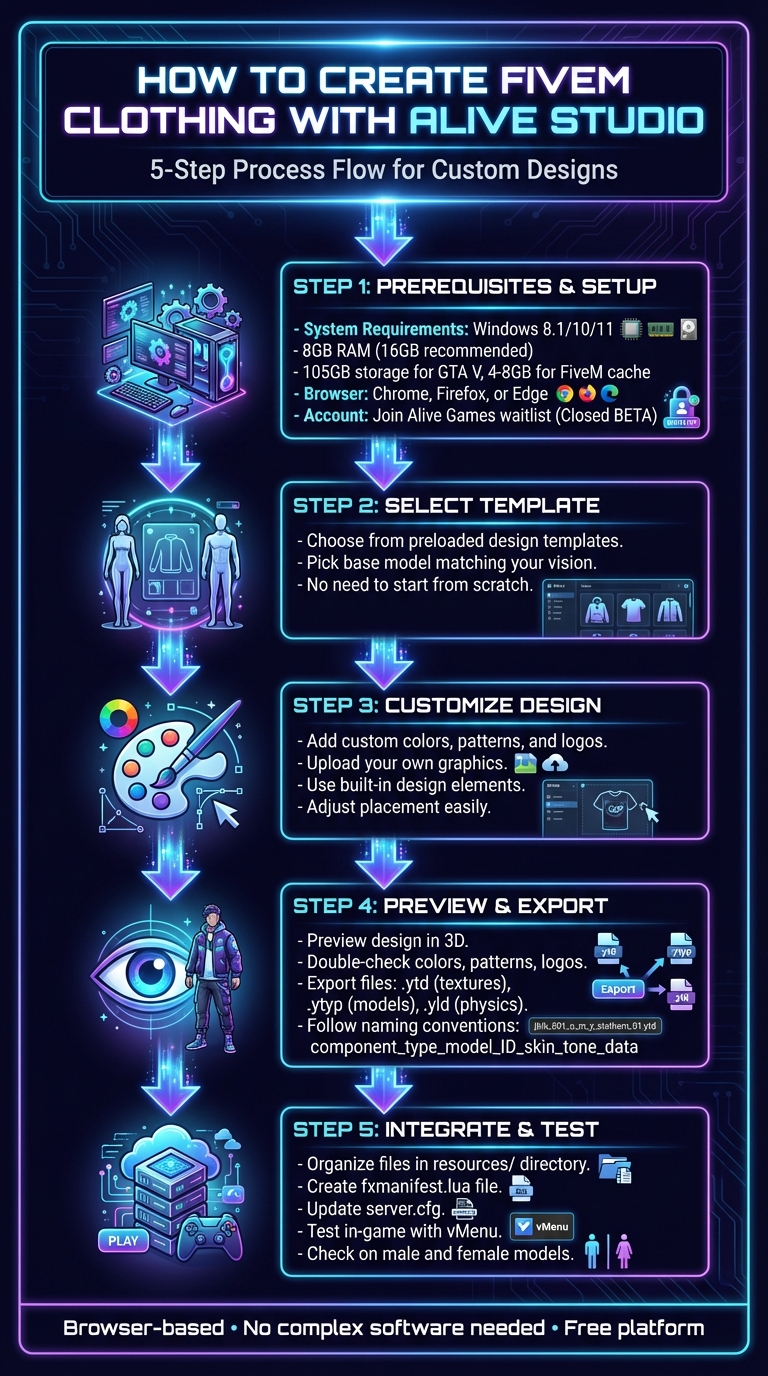
Creating custom clothing for FiveM servers can be a daunting process, but Alive Studio simplifies it. This free, browser-based tool eliminates the need for complex software, letting you design and export custom outfits directly in your browser. Here's a quick overview of what you'll need and how to get started:
- Requirements: A PC capable of running GTA V and FiveM, plus a modern browser like Chrome or Firefox.
- Setup: Sign up for an Alive Games account (currently in Closed BETA). Wait for approval to access Alive Studio.
- Design Process: Use preloaded templates, customize designs with colors, patterns, and logos, and preview them in 3D before exporting.
- Integration: Export files, organize them in a FiveM-compatible structure, and test them in-game for proper functionality.
Alive Studio streamlines the workflow, making it easier to create and upload clothing for your FiveM server without needing advanced technical skills.
Prerequisites and Setup
Get everything ready to start designing custom clothing without the hassle of bulky downloads.
System and Software Requirements
To test your custom clothing, your computer must handle GTA V and FiveM without issues. Here’s what you’ll need:
- Operating System: Windows 8.1, Windows 10, or Windows 11 (fully updated)
- RAM: At least 8GB (16GB recommended for smoother performance)
- Processor: Minimum Intel Core 2 Q6600 @ 2.40GHz or AMD Phenom 9850 @ 2.5GHz
- Graphics Card: NVIDIA 9800 GT 1GB or AMD HD 4870 1GB
- Storage: 105GB for GTA V plus an additional 4-8GB for FiveM cache
For Alive Studio, all you need is a modern browser like Chrome, Firefox, or Edge. Since it’s web-based, there’s no need to download software - just open your browser and start designing.
Creating an Alive Games for Skins Account

To access Alive Studio, head to the Alive Games website and join the waitlist. Since the platform is currently in Closed BETA, you’ll need to wait for approval before diving in. Signing up is simple - just provide your email, and the team will notify you when you’re granted access. Once approved, you can begin designing right away, completely download-free.
Understanding FiveM Resource Structure
In FiveM, custom clothing is organized into resources - folders containing everything your server needs to load your designs. Each resource lives in the resources/ directory on your server. A key file, fxmanifest.lua, tells FiveM how to load and use these files. Your models and textures should go into a stream folder inside the resource. This setup ensures that your designs are automatically delivered to players when they connect to your server, keeping everything neat and running smoothly in-game.
With these steps, you’re all set to start creating custom clothing in Alive Studio.
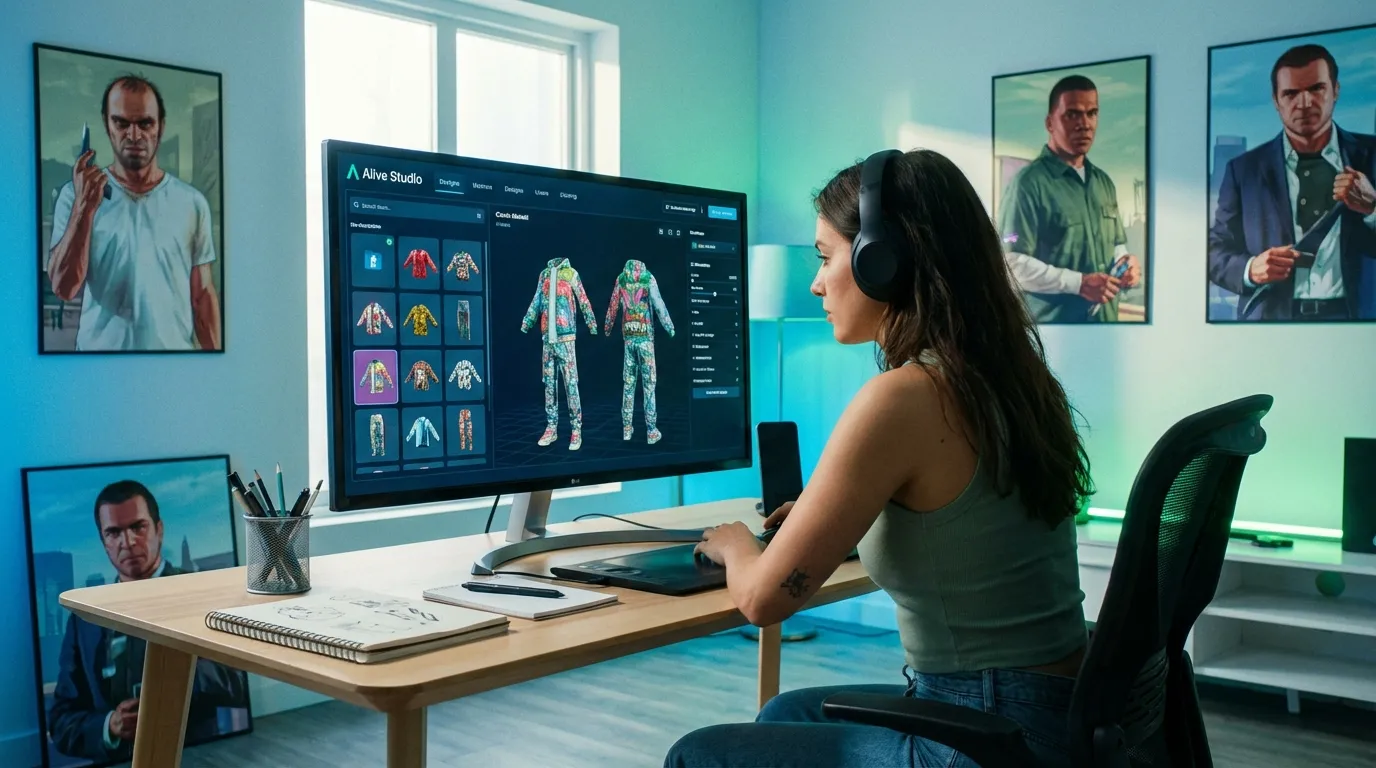
Designing Custom Clothing in Alive Studio

Now that you’re all set up, it’s time to turn your clothing ideas into reality using Alive Studio’s editor.
Selecting Templates and Base Models
When you open Alive Studio, you’ll see a variety of preloaded design templates. Start by picking a base model that matches your vision. This saves you from the hassle of starting a design completely from scratch, giving you a simpler way to dive right into the creative process. Once you’ve selected a template, you can tweak it to add your own unique touches.
Customizing Your Design
After choosing a template, the editor’s tools let you personalize your design with custom colors, patterns, and logos. Want to add your own graphics? You can easily upload them, or you can use the built-in design elements to create something that stands out. The interface is straightforward, so adjusting the placement of your designs is a breeze. Once you’re happy with the layout, you can preview your design to see how it looks.
Using the Preview Feature
The preview feature is your last stop before finalizing your design. Use it to double-check that everything - colors, patterns, logos - is exactly how you want it. If something doesn’t look right, you can jump back into the editor to make adjustments before exporting your final creation. This ensures your design comes out just the way you imagined.
Exporting and Preparing Files for FiveM
Once your design is complete, the next step is getting it ready for your FiveM server. This involves exporting your clothing assets from Alive Studio and organizing them so FiveM can properly recognize and load them.
Exporting Your Clothing Assets
When you export your design, Alive Studio generates the essential files, including .ytd files (textures) and .ytyp files (models). If your design has movement features, like flowing fabric or dangling accessories, you'll also receive .yld files for mesh physics.
It's important to follow the exact naming conventions required by FiveM. For clothing components like shirts or pants, the format is [component_type]_[model_ID]_[skin_tone_data]. For instance, jbib_000_u would represent a top with model number 000 and a universal skin tone. Props, such as hats or glasses, use p_[prop_type]_[model_ID], like p_eyes_000 for eyewear. Make sure texture files match their corresponding models, using formats like accs_diff_000_a_uni for an accessory's diffuse texture.
Once you've exported your assets and named them correctly, you're ready to organize them for FiveM.
Organizing Files for FiveM
Proper organization of your exported files is crucial for smooth integration into your server. Start by creating a resource folder in your server's resources directory. Use a clear, lowercase name with underscores, such as custom_clothing or admin_staff_vests. Place all exported .ytd and .ytyp files into the folder's stream subdirectory. Keeping things tidy reduces the risk of conflicts, like texture glitches or missing items.
You'll also need to include an fxmanifest.lua file in the root of your resource folder. This file tells FiveM what your resource contains. Finally, update your server.cfg file by adding a line like ensure custom_clothing. This ensures your new clothing pack loads automatically when the server starts.
Testing and Troubleshooting
After adding your custom clothing resource, it's time to test it in-game. Start by launching your FiveM client and connecting to your server. To check your clothing, you'll need a character customization tool like vMenu. Open the character editor, go to the clothing category where your custom item is located (e.g., tops or accessories), and select your design. If everything is configured correctly, your custom clothing should display on your character right away. This step ensures that the basic integration is working before diving into more detailed testing.
Loading Clothing on Your Server
Once your clothing is visible in the character editor, test it further by performing various actions like walking, sitting, or using animations. This helps you spot potential issues like texture stretching or misalignment that might not be obvious when the character is standing still. Also, check props like hats or glasses to ensure they fit properly and don’t clip through other items. Be sure to test on both male and female character models, as the fit and alignment can differ significantly between them.
Fixing Common Issues
If problems arise during gameplay, here’s how to troubleshoot them:
- Clothing not appearing: Double-check that your file names follow FiveM's naming conventions. Your .ytd texture files must match your .ydd model files exactly.
- Black or invisible textures: This typically points to an issue with how the texture was exported. Ensure the texture file format, compression, and dimensions are correct.
- Stretched or misaligned clothing: This is usually caused by UV mapping problems, which determine how textures wrap around the model. Adjust the mapping in Alive Studio and re-export the file.
- Skin tone issues: If parts of the clothing display the wrong skin tone, verify that the prop mask value in your configuration files is set to 17, 19, or 21.
- Server crashes or resource conflicts: Check that all files are placed correctly and review your fxmanifest.lua for errors .
Conclusion
Creating custom clothing with Alive Studio is a straightforward process: set up your account, customize templates using the online editor, preview your designs in 3D, and export the files for FiveM. What sets this platform apart is its simplicity - it eliminates the need for complex tools like OpenIV or advanced image editing software. Everything happens right in your browser.
By offering preloaded templates and an intuitive editor, Alive Studio removes technical hurdles, making it easy for anyone to get started. Whether you're designing your first hoodie or planning an entire clothing line for your server, the platform provides the tools to bring your ideas to life without requiring technical expertise.
Alive Studio caters to both newcomers and seasoned developers, allowing for the quick creation of high-quality assets. Once your designs are exported, the final step involves testing them to ensure they integrate smoothly with your FiveM resource structure. Thanks to Alive Studio's user-friendly design and FiveM's adaptable resource system, you gain full control over your server's clothing options - without the steep learning curve of traditional methods.
FAQs
How can I join the Alive Studio Closed BETA?
To become part of the Alive Studio Closed BETA, all you need to do is sign up for the waitlist on the official Alive Games platform. At this stage, access is exclusively available to those who are selected to participate in the BETA program.
What is the correct way to name files when exporting clothing for FiveM?
When exporting custom clothing for FiveM, sticking to the proper file naming conventions is crucial for ensuring everything works smoothly. Model files should follow a format like this: mp_m_freemode_01_dc^teef_000_u.ydd. For texture files, use a format like: mp_m_freemode_01_dc^teef_diff_000_a_uni.ytd.
These naming structures allow FiveM to correctly identify and load your clothing assets. Make sure to replace placeholders such as teef or 000 with unique identifiers that match your specific designs. This helps prevent conflicts with other assets in the game.
Why isn’t my custom clothing showing up in FiveM?
If your custom clothing isn't showing up in FiveM, the first thing to do is double-check the file names and ensure they're placed in the correct directory. Also, make sure Edit mode is turned on in OpenIV before making any changes. It's important that textures are exported correctly and maintain their original resolution to prevent issues like distortion or glitches.
Once you've made these adjustments, test your clothing in-game to see if it displays properly. If it doesn't, try re-importing the files to ensure they were added correctly. It's also a good idea to look for any conflicting mods that could be causing problems and verify that your software is fully updated. Following these steps should address most of the common problems with custom clothing in FiveM.