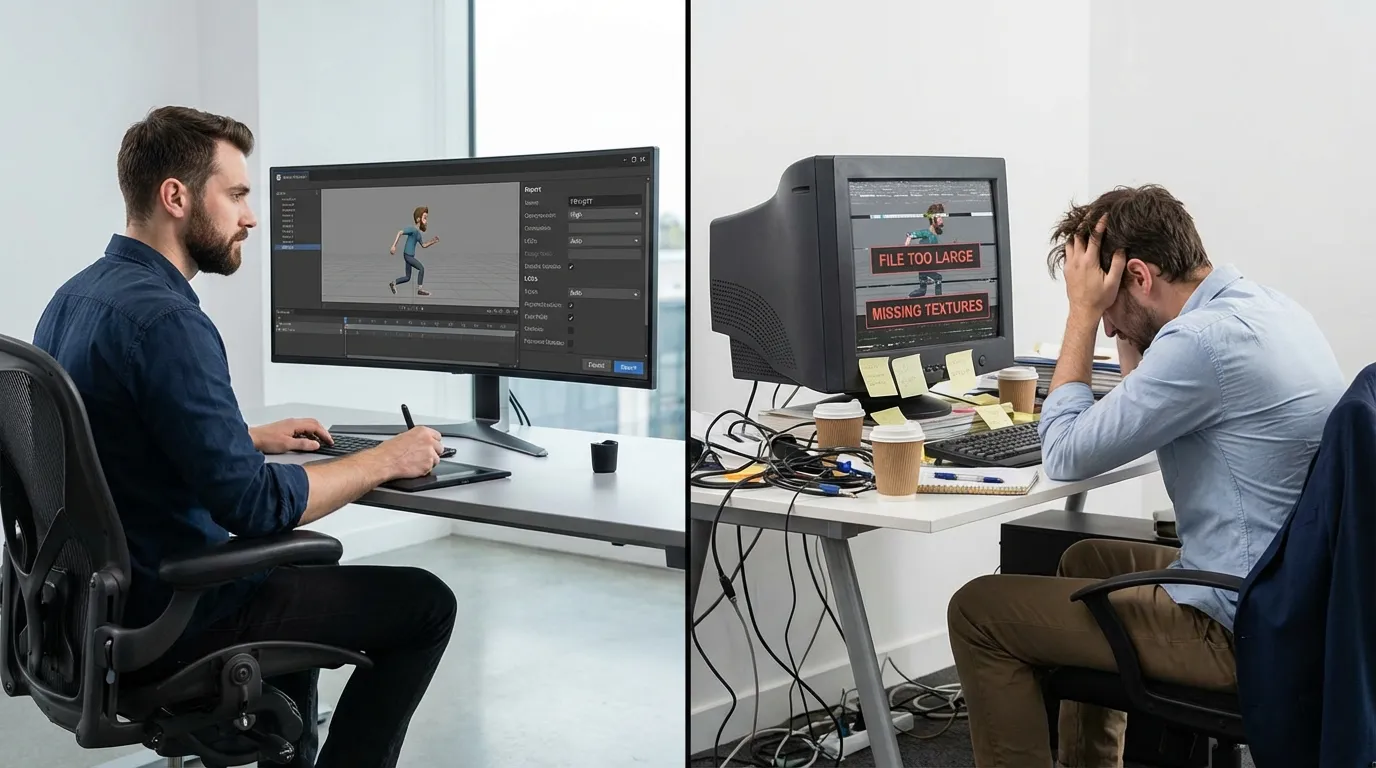
Exporting Animated Assets: Avoiding Common Mistakes
Exporting animated assets can be tricky, but getting it right is essential for smooth workflows and great results. Common issues like broken animations, oversized files, and texture problems often stem from improper export settings, leading to wasted time and project delays. Whether you're working solo or in a studio, the key is understanding the right steps, tools, and formats to use.
Key Takeaways:
- Preparation is crucial: Clean up geometry, match frame rates, and apply transformations before exporting.
- Choose the right format: FBX works best for Unity/Unreal, GLTF for web projects, and USDZ for AR applications.
- Avoid common errors: Fix broken animations, missing textures, and axis alignment issues by double-checking settings and using test exports.
- Use tools to simplify: Platforms like Alive Games for Skins save time by automating export settings for popular games like Roblox and Minecraft.
How to: Export from Blender to Unity With Troubleshooting Guide
How Animated Asset Export Workflows Work
A smooth export workflow is essential to avoid setbacks in your project. It involves several connected steps where even small mistakes can lead to bigger issues.
Main Steps in the Export Process
It all starts in your design software, where you create and rig your 3D models. Once your animations are finalized, it's time to prep the scene for export. This means selecting only the objects and actions you need to keep your file sizes manageable.
Next, you'll configure your export settings, including format and scale. Using the wrong scale can make assets appear either too large or too small in the target engine. Similarly, mismatched frame rates can throw off animation timing, creating debugging headaches later on.
The export itself generates your asset file in a compatible format like FBX or GLTF. After that, you import the file into your target game engine, such as Unity or Unreal Engine. Here, you might need to tweak materials, rigging, or animation playback. Testing is crucial to ensure that what looks great in Blender behaves as expected in the game engine.
For example, exporting a Blender animated character to Unity involves selecting only the necessary objects, setting the scale to Unity's 1 unit = 1 meter, and exporting with active animations. Once in Unity, you’ll need to adjust Rig and Animation settings and test the setup in a sample scene. This process highlights the ultimate goal: exporting animated assets without errors.
After preparing your scene, the next step is choosing the right export format for your project.
Picking the Best Export Formats
When it comes to exporting animated assets, the format you choose matters. Each format has strengths and weaknesses, depending on your project needs.
- FBX is the go-to format for Unity and Unreal Engine. It handles animations, rigging, and materials well, making it perfect for complex assets. However, its proprietary nature can make customization tricky.
- GLTF is a modern, open standard designed for web and real-time applications. It’s efficient in terms of file size and works well with PBR materials and animations, making it ideal for web-based projects. But it may fall short with advanced rigging for complex animations.
- USDZ is tailored for AR applications, especially on Apple devices. It supports animations and materials effectively but isn’t as versatile across platforms as FBX or GLTF.
Here’s a quick comparison to help you decide:
| Format | Animation Support | Material Support | Engine Compatibility | Best Use Case |
|---|---|---|---|---|
| FBX | Excellent | Good | Unity, Unreal | Complex animated assets |
| GLTF | Good | Good | Web, Unity, Unreal | Web and real-time apps |
| USDZ | Good | Good | Apple AR, Unreal | AR applications |
Once you’ve chosen your format, it’s time to prepare your asset for export.
Getting Ready Before You Export
Proper preparation can save you hours of troubleshooting later. Start by cleaning up your geometry - remove unused vertices and objects. Make sure your rigging and skinning are in order, as fixing these issues after export is much harder.
Check that your animations match the frame rate of your target engine. For instance, if your animation is created at 24 fps but your game runs at 30 fps, you’ll face playback issues that could disrupt the player experience.
Apply transformations before exporting to account for differences in axis systems between tools like Blender and Unity. Tailor your export settings to include mesh smoothing, textures, and correct object rotation. These pre-export checks help avoid misaligned assets.
Finally, optimize textures, materials, and polygon counts to improve game performance. It’s far easier to address these details before export than to fix performance problems in the game engine.
Tools like Alive Games for Skins simplify this process with user-friendly editors and automatic format optimization for games like Counter Strike 2, Roblox, Fortnite, and Minecraft.
Common Export Errors and How to Fix Them
Keeping your export workflow smooth often comes down to tackling common problems head-on. Even with the best preparation, export errors can pop up. Knowing what these issues are and how to fix them quickly can save you a ton of time and keep your projects running smoothly.
Most Common Export Problems
One frequent issue is broken animations. Picture this: a character freezes mid-jump or has a jittery walk cycle. This usually happens because of missing keyframes or messed-up timing during the export process.
Another big headache is missing textures. A model that looks great in your 3D software might turn into a plain, gray blob after export if the texture files aren’t properly linked or if the export format doesn’t support embedded textures.
Incorrect bone setups can also cause major trouble. A carefully rigged character might lose its bone hierarchy or fail to deform the mesh correctly. This often happens when transferring assets between software programs with different ways of handling rigging data.
Then there are axis alignment problems, where the asset’s orientation doesn’t match the coordinate system of the target engine. For example, Blender uses a Z-up system, while Unity uses Y-up. Without adjustments, your assets might appear rotated or misaligned.
Finally, mesh smoothing issues can make models look either too jagged or overly smooth. This is usually due to export settings that don’t preserve smoothing groups or normal data properly.
In fact, industry surveys reveal that over 50% of reported game asset pipeline issues stem from texture and animation problems.
With these common pitfalls in mind, let’s look at how to fix them.
How to Fix Export Errors
Once you’ve identified the problem, there are targeted fixes you can apply. Start by reviewing the game engine’s import logs after bringing in your asset. These logs often point out missing files, incompatible settings, or corrupted data that could be causing the issue.
For broken animations, head back to your 3D software and use tools like Blender’s NLA editor to clean up your animation actions. Remove any unnecessary or test animations that might interfere with the main sequences, and make sure all keyframes are properly baked before re-exporting.
To resolve missing texture issues, double-check that all texture files are linked correctly. Use file formats that support embedded textures, set texture paths to be relative, and ensure your export settings include the necessary texture data.
If you’re dealing with incorrect bone setups, review your rigging to confirm that all bones maintain their hierarchy and parent-child relationships. Test the rig thoroughly in your 3D software before exporting again. Using standardized skeletons, like Unity’s humanoid rig system, can help reduce compatibility problems.
For axis alignment problems, adjust your export settings to match the target engine’s coordinate system. Set the correct forward and up axes (Y-up for Unity, Z-up for Blender), then preview the asset in the engine and tweak the settings until everything lines up.
When troubleshooting, it’s best to work with small test exports instead of full asset packages. This way, you can pinpoint the exact setting or element causing the issue without wasting time on lengthy export cycles.
Also, make sure to apply all transformations - location, rotation, and scale - before exporting. This step helps prevent coordinate mismatches.
Lastly, consider using web-based tools like Alive Games for Skins. These platforms offer pre-configured export settings tailored for popular games like Counter Strike 2, Roblox, Fortnite, and Minecraft. They handle format compatibility automatically, cutting down on manual troubleshooting when moving assets between different software programs.
Best Methods for Exporting Animated Assets
Exporting animated assets for game engines isn't just about clicking the export button and hoping for the best. A smooth process relies on proven techniques that can save you from hours of troubleshooting. Here's how professionals ensure their assets integrate seamlessly into game engines.
Setting Up Export Options Correctly
Your export settings act as the bridge between your 3D software and the game engine. For animated assets, FBX is the go-to format for Unity and Unreal Engine because it supports meshes, bones, and animation data effectively. When exporting, make sure to enable the 'Animation' option and match the frame range precisely to avoid issues.
Pay close attention to axis orientation, as different software uses different coordinate systems. Set the forward and up axes to match the target engine's requirements. This prevents your characters from importing sideways or upside-down.
When it comes to bones, only include the ones used in your animations. Extra bones, like helper or construction elements, can cause confusion during import and unnecessarily increase file size. Double-check the bone hierarchy in your export dialog to ensure compatibility with your target engine.
Texture packing is another critical detail. If your asset uses multiple materials, decide whether to embed textures in the FBX file or keep them separate. While embedding textures simplifies the process by avoiding missing references, it can result in larger file sizes.
For GLTF exports, commonly used in web-based applications, ensure animations are enabled and verify that UV mapping and color data are included if needed. GLTF is a great choice for browser-based viewers due to its smaller file sizes compared to FBX.
Once you've configured your export settings, organize your files systematically to streamline the integration process.
Keeping Files Organized and Clean
A well-organized file structure can save you countless headaches later. Start by using clear and consistent naming conventions that identify the asset type, animation name, version number, and target platform. For example, a name like character_run_v02_fbx makes it easy to understand what the file contains.
Separate your workflow into dedicated directories - one for source files, another for exported assets, and additional folders for platform-specific versions. Create subfolders for different animation types, such as locomotion, actions, and reactions. This level of organization is especially helpful when managing multiple animations for a single character.
Before exporting, clean up your scene. Remove unnecessary objects, helper geometry, and unused actions or clips. In Blender, you can review the exported structure in JSON format to identify and delete any redundant animations. This step reduces file size and ensures only essential elements are included.
Check that all bones and joints are properly named and follow a logical hierarchy. Game engines rely on consistent naming to map animations correctly. Also, ensure that all materials and textures are correctly assigned, with no broken references.
Consider maintaining a master documentation file to track all animations, their frame ranges, and export settings. This helps maintain consistency across your asset library and ensures your team has a clear understanding of the project structure.
Using Web-Based Tools Like Alive Games for Skins
Beyond precise export settings and file organization, web-based tools can simplify the process even further. Platforms like Alive Games for Skins are designed to streamline exporting by handling many of the manual steps that often lead to errors. These tools come with pre-configured templates tailored for popular games like Counter Strike 2, Roblox, Fortnite, and Minecraft. This means you start with optimized settings for each platform, saving time and effort.
The platform supports multiple export formats, including FBX, GLTF, and USDZ, without requiring manual configuration. This is particularly useful when deploying the same asset across various platforms like web browsers, mobile AR apps, and traditional game engines.
Alive Games for Skins eliminates the need for extra software, reducing setup time and ensuring consistent results. For teams working on multiple projects, this consistency is crucial, as it avoids the common issue of team members using different export settings.
With customizable templates, you can work from pre-configured skeletons, animation ranges, and export settings that align with industry standards for supported games. Instead of starting from scratch, you can build on settings that are already optimized for your target environment, speeding up the entire process.
Conclusion: Getting Better at Animated Asset Export
Improving your animated asset export process boils down to a few key practices. First, export only the actions and animations you need. This keeps your files lean and manageable. For Blender users, the NLA editor is a handy tool to specify which actions to include in your export.
Next, choose the right format for your platform. Web applications typically work best with GLB/GLTF formats, while game engines like Unity often require texture atlases. If you're exporting in GLTF, using the JSON format can help you easily inspect the file structure and confirm the right actions are included.
Finally, optimize for performance. Adjust file size, texture resolution, and animation complexity to meet the needs of your target platform. Always test your exported assets in their intended environment - whether that's a browser, game engine, or mobile app - to catch potential issues before deployment.
For an extra layer of efficiency, tools like Alive Games for Skins can simplify your workflow. This platform offers centralized asset management, pre-configured export templates, and built-in presets that cut export time by 30–50% while maintaining quality. Plus, its support for multiple formats (FBX, GLTF, USDZ) and real-time preview features can help you achieve consistent results with fewer iterations.
FAQs
How can I avoid common export issues like broken animations or missing textures when exporting animated assets?
To avoid export mishaps like broken animations or missing textures, start by making sure all your assets are properly linked and ready to go before exporting. Check that your animation sequences are complete and work seamlessly with the game engine or tool you're targeting. Also, take a moment to verify texture paths - this ensures they’re correctly referenced and don’t go missing during export.
When it’s time to export, stick to the recommended settings for your platform or software. Some tools may require specific file formats or compression settings to preserve both quality and compatibility. Running tests on your exported assets in a controlled environment can help you catch and resolve any problems before the final rollout.
For added convenience, tools like Alive Games for Skins can streamline the process. They offer features like customizable templates and exportable formats, making it easier to create and integrate top-notch assets into popular games without needing extra software.
What is the best export format for my project, such as web apps or AR experiences?
When selecting an export format, it’s all about matching the needs of your project with the platform you’re working on. For web applications, SVG and WebP are excellent choices. They’re lightweight, scalable, and perform well in browsers. On the other hand, if you’re working on AR experiences, consider using formats like GLTF/GLB or FBX, as these are widely supported by most AR tools and frameworks.
Make sure to review the documentation for your target platform or engine to confirm that your chosen format is fully supported. This step can help you sidestep compatibility problems and ensure your assets function seamlessly.
What are the best practices for exporting animated assets to ensure compatibility and performance across game engines?
To make sure your animated assets work effortlessly in various game engines, stick to these practical tips:
- Choose the right file formats: Stick with widely accepted formats like FBX or GLTF. These formats preserve animation data and are compatible with most game engines, making integration smoother.
- Keep animations simple: Simplify motion paths and cut down on unnecessary keyframes. This not only reduces file sizes but also boosts performance during gameplay.
- Match engine requirements: Game engines often have specific import guidelines. Double-check settings like frame rates, rig structures, and texture resolutions to avoid any hiccups.
Following these steps helps your assets perform reliably across platforms, reducing errors and improving the gaming experience.