
AI Texture Generators for Roblox Skin Design
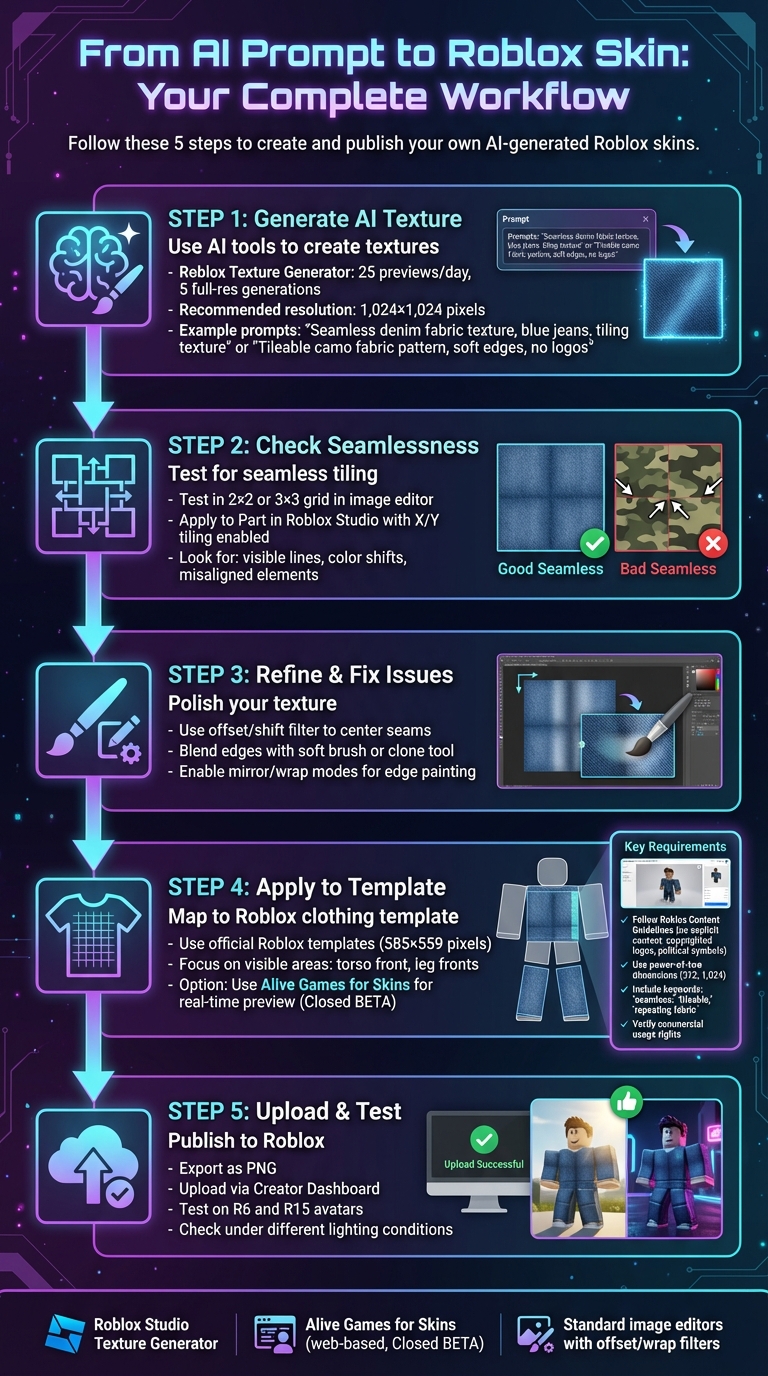
AI texture generators simplify creating Roblox skins by letting you describe your design idea in text and instantly generating high-quality textures. These tools save time by automating steps like UV mapping and alignment, making the process faster and easier for beginners and experienced designers alike. For example, you can request patterns like "denim fabric" or "camo design" and apply them directly to Roblox templates.
Here’s what you need to know:
- What They Do: AI tools create tileable textures for clothing and accessories, avoiding visible seams or mismatches.
- How They Help: They streamline skin creation, skipping manual design software and integrating directly with Roblox tools.
- Key Features: Generate textures optimized for Roblox avatars, test for seamless patterns, and refine designs with tools like Alive Games for Skins.
- Best Practices: Use prompts like "tileable fabric pattern" for clean results, follow Roblox content guidelines, and test textures on 3D models before uploading.
AI tools like Roblox Studio's Texture Generator and Alive Games for Skins make designing skins more accessible and efficient. By focusing on quality and compliance, you can quickly create polished, game-ready designs.
Creating Seamless Textures for Roblox Skins with AI
Understanding Seamless Textures
Seamless textures are 2D images designed to repeat both horizontally and vertically without any visible breaks or mismatches. For Roblox clothing, this ensures that designs wrap smoothly around 3D avatars without awkward gaps or misaligned edges. Think of it like wrapping paper - if the edges don’t align perfectly, the result looks messy and unpolished. By mastering seamless textures, you can create professional-looking designs tailored for Roblox.
Tips for Generating Seamless AI Textures
When working with AI tools, crafting the right prompt is key. Include details about the style, material, and level of detail, along with clear instructions for tiling. Keywords like "seamless pattern", "tileable", "repeating fabric," or "looping design" help guide the AI to produce edge-friendly textures. For example, you might use prompts such as:
- "Seamless denim fabric texture, blue jeans, tiling texture"
- "Tileable camo fabric pattern, Roblox shirt, soft edges, no text, no logos, seamless repeat"
Additionally, mentioning the specific use case - like "for Roblox avatar clothing" - can help some tools generate smaller, detailed textures suited for dimensions like 512×512 or 1,024×1,024 pixels.
Roblox supports two main types of AI-generated textures: contextual per-mesh texturing (via the Texture Generator) and repeating/tiled textures (better suited for Material Generators). For avatar clothing, focus on tools or settings optimized for tileable materials to ensure clean and consistent patterns across the entire template. Always review the quality of your textures before applying them to Roblox skins.
Checking and Refining Seamless Patterns
Before uploading your texture to Roblox, it’s crucial to confirm that it’s truly seamless. Start by testing it in an image editor. Place multiple copies of the texture side-by-side in a 2×2 or 3×3 grid. If you notice visible lines, color shifts, or misaligned elements where the tiles meet, the texture needs adjustments.
In Roblox Studio, you can further test the texture by applying it to a Part (such as a cube or block). Enable tiling in both the X and Y directions and examine the texture for any misaligned stripes or broken seams when wrapped around a 3D model.
To fix minor issues, use your editor’s offset or shift filter (often labeled as "Offset" or "Wrap"). This moves the image so that the edges meet in the center, making it easier to spot and correct seams. Use tools like a soft brush, clone tool, or blur filter to blend any visible lines. When painting near the edges, enable mirror or wrap modes to ensure strokes repeat seamlessly to the opposite side. For harsher edges or high-contrast lines, softening or blurring the boundaries can help hide imperfections when the texture is tiled.
Finally, tools like Alive Games for Skins allow you to preview and tweak textures directly on 3D models, making it easier to spot and fix alignment problems before finalizing your design.
Applying AI Textures to Roblox Skins
Using Roblox Templates for Clothing Design
Roblox clothing templates are blank PNG files designed to map your clothing designs onto different parts of an avatar's body. Each template is divided into specific sections - like the torso front, torso back, left arm, and right arm for shirts, or the waist, legs, and feet for pants. These labeled areas help you position your designs accurately.
When working with AI-generated textures, focus on the most visible areas, such as the torso front and the fronts of the legs. These spots are where players' eyes naturally go, making them ideal for detailed patterns, logos, or standout elements. Simpler or repetitive patterns can go on less noticeable areas like the back of the legs or underarms. To avoid unsightly gaps or misaligned patterns, make sure your design lines up perfectly along the template edges.
To get started, open the official Roblox template in an image editor and add your AI-generated texture as a new layer. Carefully position and scale the texture so that important details land in the correct sections - like centering chest designs on the torso front or placing arm patterns on the side rectangles. Use the template's labels as a guide to ensure everything fits seamlessly.
Alive Games for Skins: A Web-Based Tool for Refinement

Alive Games for Skins simplifies the design process by letting you work directly with Roblox templates in a browser-based editor. Instead of downloading templates and manually aligning textures in separate software, this tool allows you to upload your AI texture and see how it maps onto the avatar in real time.
The tool offers features like drag-and-drop alignment, scaling, rotation, and layer adjustments to fix any stretching or misalignment. You can also tweak color schemes or pattern density to refine your design further. Once you're happy with the placement, the platform exports your design in a Roblox-ready PNG format with the correct dimensions (usually 585×559 pixels for classic clothing). This file is then ready to upload to Roblox. Keep in mind that Alive Games for Skins is currently in Closed BETA, so you'll need to join the waitlist for access.
Uploading and Applying Textures in Roblox
After finalizing your design, it’s time to bring it into Roblox. Export your texture as a PNG file, then log in to the Roblox Creator Dashboard. Navigate to the "Creations" or "Avatar Items" section, and select the appropriate category - Shirts, T-Shirts, or Pants. Click the upload or "Create" button, choose your PNG file, and add a name and description. If required, pay the Robux fee for the asset type. Roblox will review your submission through moderation before it’s approved.
Once approved, you can equip your new creation on your avatar. Open Roblox (either on the web or in the app), go to your Avatar page, and apply the item to see how it looks. Alternatively, you can test it in Roblox Studio by loading your avatar or an NPC. Insert a Shirt or Pants object, then paste the asset ID of your uploaded item into the corresponding property. To ensure your design looks great, preview it on various avatar body types (like R6 and R15) and test it under different lighting conditions. This helps confirm that your texture aligns correctly and maintains its color and detail across all settings.
Best Practices for AI Texture Design in Roblox
Following Roblox's Content Guidelines
Roblox's Community Standards and Marketplace rules are clear: your AI-generated textures must not include sexually explicit content, nudity, discriminatory imagery, extreme violence, political symbols, or copyrighted logos or brand patterns unless you own the rights[2, 11]. This means every texture should be carefully examined for hidden elements like text, recognizable symbols, or faces before uploading. Even patterns that might unintentionally resemble official logos or brands should be avoided. A thorough review can save you from potential moderation issues.
Before uploading, take time to inspect your texture for any unintended details the AI might have slipped in - this could include tiny logos, odd shapes, or text that could be misinterpreted. If you’re unsure whether a design resembles a real-world brand or symbol, it’s better to regenerate the texture. Roblox caters to a diverse audience, including children, so keeping designs appropriate and family-friendly is a must. Once compliance is ensured, you can move on to refining the texture's quality and resolution.
Optimizing Texture Quality and Resolution
Roblox's Texture Generator typically creates 1,024×1,024 textures for MeshParts, which serves as a great benchmark for custom textures[7, 2]. For optimal performance and clarity, stick to dimensions like 512×512 or 1,024×1,024. When using external AI tools, include prompts like "square, 1024x1024 seamless fabric pattern" to prevent issues like stretching or cropping when applied to Roblox clothing templates[7, 3].
For key assets, use high-resolution textures (1,024×1,024), while background elements can use lower resolutions to improve game performance. Avoid overly busy or high-contrast patterns, as these can create visual clutter and interfere with gameplay elements like the UI. Stick to power-of-two dimensions (256, 512, 1,024), which Roblox processes more efficiently, and use compressed, non-transparent textures whenever possible. Reserve alpha channels for specific cut-outs, as they can be resource-heavy. Always test your textures on different avatar body types (R6 and R15) and under varied lighting conditions to ensure they look polished in standard gameplay environments. Once your textures are optimized, you can focus on applying them consistently across projects.
Using AI Textures Across Multiple Projects
Once you’ve created compliant, high-quality textures, you can extend their use across multiple projects. Many AI tools offer broad usage rights, but always confirm that your chosen tool permits commercial use. When reusing textures in various Roblox experiences, double-check that you have the legal rights to do so and that no copyrighted elements have slipped into the design[2, 3].
If you plan to export these textures for use in other games like Fortnite, Minecraft, or Counter-Strike 2 through platforms such as Alive Games for Skins, be sure to follow each game's specific user-generated content (UGC) and marketplace rules to avoid takedowns. To stay organized, use a clear naming system like "fabric_camo_blue_v3_1024" to maintain consistency across projects[2, 3]. Save both the original AI output and any edited versions (e.g., "_raw", "_edited", "_for_roblox") so you can track which textures are ready for Roblox or other platforms. Storing these assets in a shared library - whether through version control software or a Roblox group library - lets you reuse approved textures without repeating compliance checks.
A streamlined workflow might look like this: generate your textures in Roblox Studio, refine them using an external editor like Alive Games for Skins, and then re-import them. This approach helps you maintain high visual quality, a consistent design style, and compliance with moderation standards across all your projects.
Conclusion and Key Takeaways
How AI Texture Generators Benefit Roblox Creators
AI texture generators are changing the game for Roblox creators by simplifying the design process and saving time. Instead of mastering complex design software, you can now describe your vision - like a "purple cyberpunk hoodie with neon circuit patterns" - and get a ready-to-use texture in just minutes. With Roblox's built-in Texture Generator, you can preview up to 25 textures daily and generate 5 full-resolution versions, giving you plenty of opportunities to experiment and perfect your designs before finalizing them. This quick turnaround lets you test various styles, colors, and patterns until you find the perfect fit for your avatar or game project.
Pairing AI tools with smart optimization techniques ensures your textures are sharp, compliant, and adaptable for different avatars. By sticking to recommended resolutions such as 1,024×1,024 pixels and following Roblox's content guidelines, you can create textures that look great under various lighting conditions and avoid moderation issues. Over time, building a library of high-quality, reusable textures will save you effort while maintaining a consistent visual style across your projects.
Refining Textures with Tools Like Alive Games
Alive Games for Skins adds another layer of customization, allowing you to refine AI-generated textures directly on Roblox templates via a web-based editor. With this tool, you can import your textures, align them with clothing templates, and fine-tune details like logos, colors, or patterns - no extra software required. This can be especially useful for ensuring that elements like seams, cuffs, and collars align perfectly across all parts of your design.
For example, a beginner could start by describing their idea to an AI generator, download the resulting texture, and upload it into Alive Games. From there, they can adjust the placement of patterns, tweak colors, add small logos, and ensure clean edges before exporting the final image ready for Roblox Studio. This seamless workflow makes it possible to go from concept to a polished, game-ready design in just one evening - even if you're new to design.
Steps to Get Started with Roblox Skin Design
Start by experimenting with Roblox's AI Texture Generator to refine your prompts and explore different styles. Whether you're aiming for realistic fabrics or fantastical patterns, don't hesitate to iterate and experiment. Once you've created textures you like, use tools like Alive Games to polish them further, paying attention to details that can elevate the final look.
Organize your creations into a well-named library for easy reuse. This collection will become your go-to resource for quickly assembling new outfits and accessories without starting from scratch every time. By combining AI tools, careful refinement, and effective asset management, you'll not only improve your technical skills but also develop your unique design style - taking your Roblox skin design to the next level. With this approach, you'll be well on your way to creating standout designs that set your projects apart.
FAQs
How can AI texture generators enhance the process of designing Roblox skins?
AI-powered texture generators simplify the process of designing Roblox skins by automating the creation of seamless, detailed textures. This not only saves time but also eliminates much of the manual effort involved, all while delivering impressive results.
These tools allow users to customize textures effortlessly, enabling the creation of distinctive and lifelike designs. Whether you're a novice or a seasoned designer, AI makes it easier to turn creative concepts into reality.
How can I create seamless textures for Roblox skins using AI tools?
Creating seamless textures with AI tools involves generating tileable patterns that repeat without visible edges. Start by adjusting the tool's settings to maintain consistency throughout the design. Then, fine-tune the details using editing software to achieve a polished look. Once your texture is complete, test it within the Roblox environment to ensure it blends perfectly without disrupting the overall design.
If you're looking to add a personal touch, you can customize the textures further to make your designs stand out. Platforms like Alive Games for Skins offer intuitive tools that allow you to create and personalize seamless textures, even if you don’t have advanced technical skills or software experience.
How do I make sure my AI-generated textures follow Roblox's content guidelines?
To make sure your AI-generated textures align with Roblox's content guidelines, steer clear of anything inappropriate, offensive, or infringing on copyrights. Take the time to go through Roblox's community standards to get a clear picture of what's allowed. It's always smart to use moderation tools and double-check your designs manually before uploading them.
For a smoother workflow, you might want to explore tools specifically built to create high-quality textures that comply with Roblox's rules. These tools can make the process easier and help ensure your designs meet the platform's expectations.